≡APEX2EBS≡ v 2.0
User Guide
Contents
Part 1 – Set up Oracle XE 11g R2
Part 2 – APE2EBS Perquisite Setup
Part 3 – APEX2EBS Installation
Part 6 – Assign Page Group and Hide a Page
Part 9 - Create a New APEX2EBS Page
Part 1 – Set up Oracle XE 11g R2
· Download Oracle Database Express Edition 11g Release 2 (Windows x32, Windows x64, or Linux x64) from here.
· Start the installation, take all default settings. Use “manager” as password.
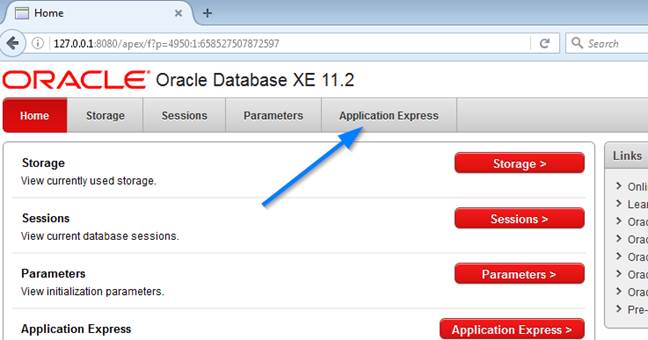
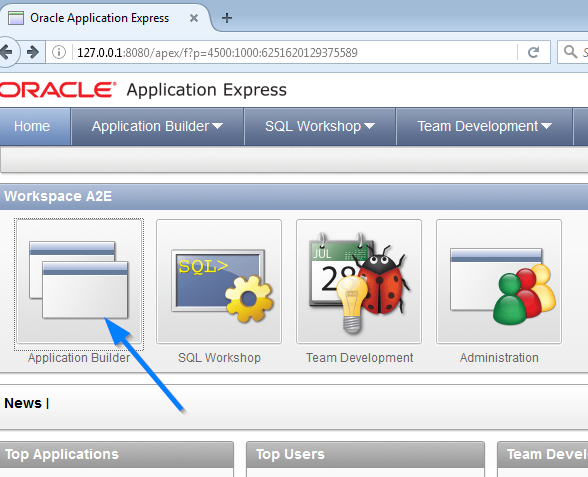
· Click the "Get Started…" icon (Windows) or open a browser with URL http://127.0.0.1:8080/apex/f?p=4950
· Click "Application Express" tab
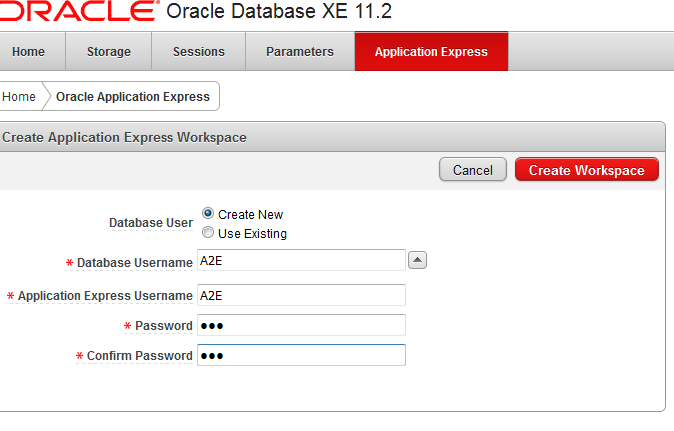
· Enter user name "system" and password "manager". Click “Login” button

· Select "Create New" for Database User. Enter "A2E" for all others fields. Click "Create Workspace" button.
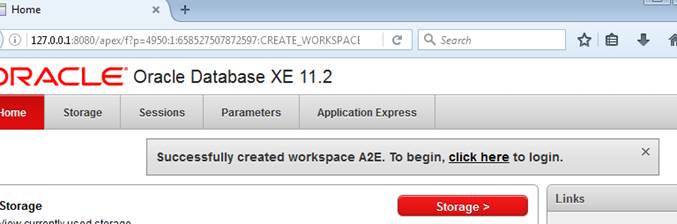
· After the workspace A2E is created, follow the “click here” link, or change URL to http://127.0.0.1:8080/apex
· Keep the browser open and proceed to Part 2.
Part 2 – APE2EBS Perquisite Setup
· Download the latest version of APEX2EBS archive from SourceForge
· Unzip the archive to any directory (e.g. C:\APEX2EBS)
· Select "Run SQL Command line" shortcut under "Oracle Database 11g Express Edition"

· Enter "connect / as sysdba", and run command "grant create database link to A2E;"

· Connect to A2E schema through command "connect A2E/A2E". Run the following scripts with this order:
@C:\APEX2EBS\APEX\SQL\APEX2EBS.ddl
@C:\APEX2EBS\APEX\SQL\A2E_LANG_MAPPING_DATA.sql
@C:\APEX2EBS\APEX\SQL\APEX2EBS_PKG.pks
@C:\APEX2EBS\APEX\SQL\APEX2EBS_PKG.pkb
You should see the "Warning: Package Body created with compilation error". Don’t worry it is expected.

Issue “exit” to close the command prompt. Proceed to Part 3.
Part 3 – APEX2EBS Installation
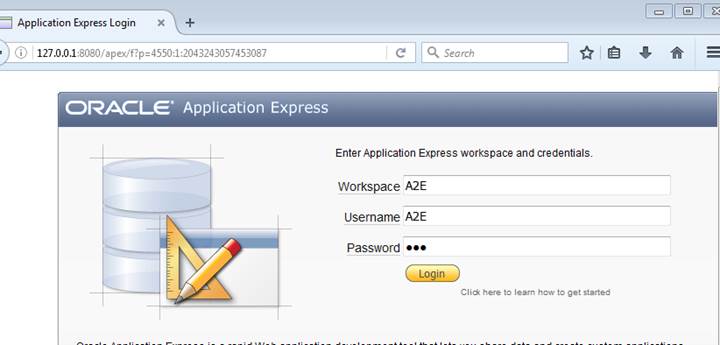
· From the end of Part 1, you should have a browser open with URL http://127.0.0.1:8080/apex/
· Enter “A2E” for workspace, username, and password, then click "Login" button.
· Click “Application Builder” icon
· Click the “Import” button

· For the Import file, select C:\APEX2EBS\APEX\SQL\APEX2EBS_CORE.sql. For the File Type, take the default value of "Database Application, Page or Component Export".

· Click “Next” button, and “Next” button again to go to Install Application Page
· Use the following settings:
Parsing Schema A2E (default)
Build Status Run and Build Application (default)
Install As Application Reuse Application ID 301 From Export File
· Click "Install" button

· After the application is installed, click the “Application Builder”.

· Repeat the above steps to import “C:\APEX2EBS\APEX\SQL\APEX2EBS_EXAMPLE.sql”. Make sure you choose "Reuse Application ID".
· After the installation has done, you should see both "301. APEX2EBS " and "311. A2E Example".
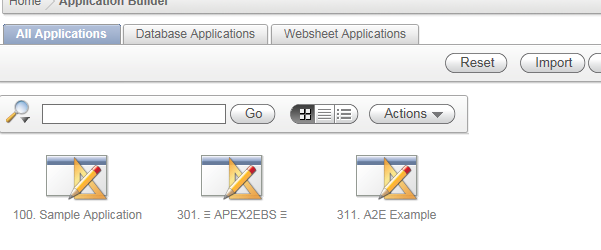
Close the browser, open the browser again using URL http://127.0.0.1:8080/apex/f?p=APEX2EBS
Part 4 – APEX2EBS setup
· Set "No" to "Use TNS Entry"
· Enter database hostname (or IP), port number, and DB name for your EBS instance.
· The Connect Schema is APPS by default, and enter the APPS password. Then check "Create DB Link and Configuration".
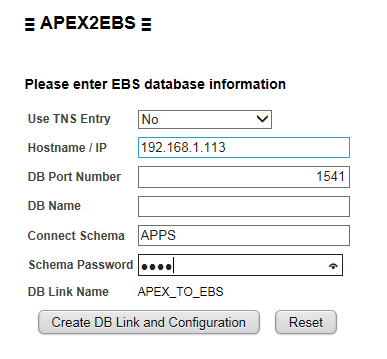
· After the configuration has done, it shows the info of your EBS database. Click "Login Page" button.

Part 5 – Create Page Mapping
· The URL of Login page is http://localhost:8080/apex/f?p=APEX2EBS:LOGIN
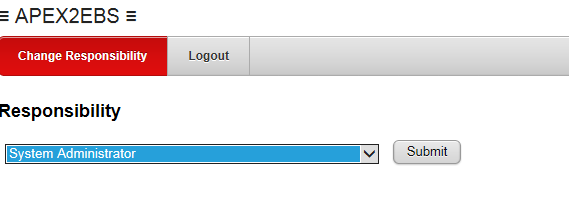
· Login to the application using any user, e.g. sysadmin, which has the "System Administrator" responsibility.
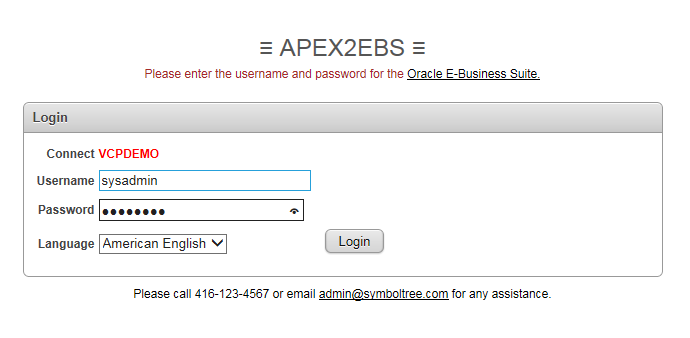
· Select the Responsibility "System Administrator"
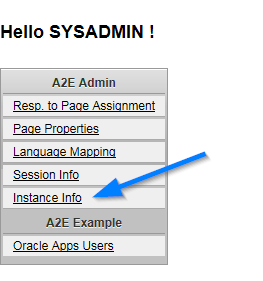
· It will go to the Home Page. The Navigator contains the links which can be accessed by current responsibility and user. The initial configuration assigned the page group "A2E Admin" to System Administrator" Responsibility.
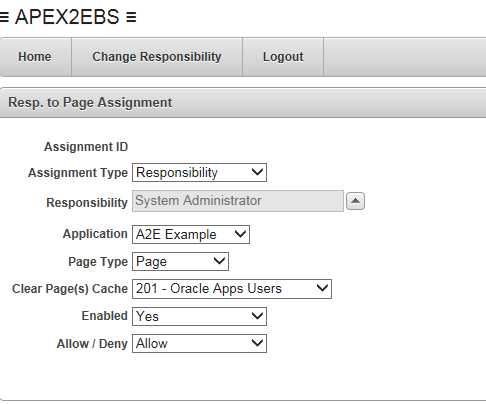
· Click the "Resp. to Page Assignment" Link.

· We need to add the page "201 - Oracle Apps User" resided in "A2E Example" application to responsibility "System Administrator". Select the values as shown below and click "Add" button.
· Click the Home tab to get back to Home Page.
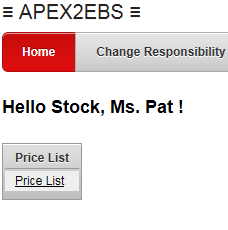
· A new link "Oracle Apps Users" is added to the Navigator.

Part 6 – Assign Page Group and Hide a Page
· APEX pages can be bundled in a Page Group. If a Page Group is assigned, all pages for this Page Group are listed in the Navigator. However, some pages are not supposed to be used directly. In the Example Application, it has a page group called "Price List", which consists of two pages -- one page to search for a price list, and another page is to do manipulation on a selected price list. Only the price list searching page should be shown in the navigator.
· Assign the page group "Price List" to Order Management Superuser responsibility, similar as follows:

· After this assignment has done, go back to Home Page and click "Page Properties".
· Click the "Edit" button for page "212 - Change Item Price". Change the Hidden from Navigator to "Yes". Click "Save".

·
Login
to a user which has this Order Management Superuser responsibility. Select this
responsibility and you should see only one link is shown for this page group
(which is displaced as table header).
· These pages requires server side package to work. You need to install the package "C:\APEX2EBS\EBS\SQL\APEX2EBS_PRICE_LIST_RPC_PKG.SQL" in your EBS instance under APPS schema.
· The Example Application also contains a page called "Change Item Properties". This page requires the file "APEX2EBS_UPDATE_ITEM_RPC_PKG.SQL" installed in the EBS instance.
Part 7 - EBS Integration
· You can access APEX2EBS from Oracle EBS by integration setup and custom menu function. The integration requires three parts:
I. Profile Option "FND: APEX URL"
· For R12, apply patch 12316083 to create this profile option. Review doc 1306563.1 for details
· If you're using 11i environment, or you're not able to apply this patch, you can create this profile option manually:

· Set this profile option value to the base URL of you APEX application, i.e. the part just before "f?p=XXX"
II. Custom JSP "a2e.jsp"
· Copy the file C:\APEX2EBS\EBS\ebs\jsp\a2e.jsp to $OA_HTML directory of your EBS APPL_TOP server.
EBS 11i Instance
Bounce Apache, or
Compile JSP
*nix platform
cd $FND_TOP/patch/115/bin/
perl ojspCompile.pl –compile –flush -p 2
Windows platform
cd %FND_TOP%\patch\115\bin
perl -x ojspCompile.pl –compile –flush
EBS R12 Instance
This JSP file will be compiled after a patch is applied, or
In the context file, change OA_VAR "s_jsp_main_mode" value from "justrun" to "recompile".
Run Autoconfig to propagate the changes to the configuration files.
Restart OPMN (adopmnctl stopall then startall)
III. Create custom function
· To access any page under APEX2EBS, you need to create a Form Function with Type "SSWA jsp function" and HTML Call using the syntax of: a2e.jsp?app=[ID or Alias]&page=[page ID or Alias]
· e.g.To access the Responsibility-to-Page Mapping APEX Page, the function's HTML call will be
a2e.jsp?app=APEX2EBS&page=203
a2e.jsp?app=301&page=203
· Assign this function to a menu.
When this function is invoked from a menu, it will open the a2e.jsp. Both parameters app and page are passed to construct a URL which take the Profile Option for APEX server location. The same EBS user and responsibility are used to open up the target page in APEX side. A new tab "Back to EBS" is shown, which allows users to go back to EBS.

Part 8 – Drop Configuration
· Under System Administrator Responsibility, from the Navigator go to page Instance Info
· Then click the "Drop Instance Info" button

· Select the options whether you want to drop the mapping info and session audit info. If you just want to change the EBS instance it connected to (e.g. from DEV instance to QA instance), you could keep the page mapping.

· Click "Drop Configuration", confirm the action, then the configuration will be dropped. It will go back to Setup Page.
Part 9 - Create a New APEX2EBS Page
· You should NOT create new pages under the APEX2EBS application. The proper way of developing new APEX2EBS page should be:
o Import the template application (APEX2EBS_TEMPLATE.sql).
o The default application name is called "A2E Template". Change the name to "GL", "AP", or anything which reflects the purpose of this application. For demo purpose, in here the application name is changed to "Payables"
o Make sure the application group is "A2E Application". Only the pages or page groups within this Application Group can be used in APEX2EBS.

· The default authentication schema is "A2E AUTHENTICATION", and no Authorization Scheme is assigned. After a new page created, you have to change the Authorization Schems to "A2E Page Authorization" in order to create enforce the page security role (which is controlled by the Resp. to Page Assignments).

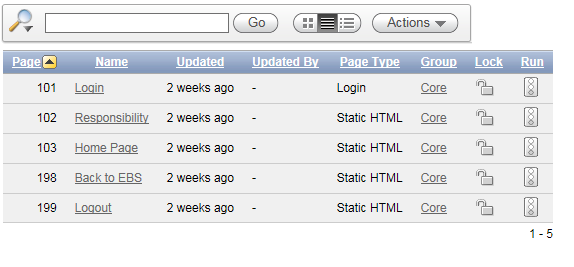
· The Template Application consists of 5 pages. Do not change anything in these pages.
· Create Page > Report > Classic Report. Set the Page Number to 201, or any number which is larger than 200. This is the rule that these pages can be shown in the Navigator. Any page Number lower than 200 is considered to be internal use.

· Enter the SQL in this file. Carry on the page creation wizard and take all the default values.
· Change the Page Template to "One Level Tabs - Right Sidebar (optional-based)". Change the Standard Tab Set to "TS1 (Home...)".

· Change the Authorization Scheme to "A2E Page Authorization".

· Log on to APEX2EBS, Go to System Administrator, assign this page to any Payable responsibility.

· Log on to APEX2EBS with user which has this Payables responsibility. The "AP Invoices" link is shown in the Navigator, and it is the classic report you just created.


For any problem or feedback please drop a line at symbolthree.freeforums.net or visit www.symbolthree.com regularly for any update.